Due to travelling back from YAPC::NA poor Markie missed his first Father’s day as a daddy of two, so I thought it would be nice if the kids and I made him a special card. I do a lot of homemade cards and I don’t usually write blog posts about them, but I’m pleased with how this one came out and there are some nice elements you can involve young children with, so I thought I’d do a little ‘how to’ guide in case you fancy having a go with your own kids for the geek in their life :).
you will need:
1 sheet of A3 white card
3 sheets of A4 coloured paper/card of choice
1 sheet of White paper
A selection of geeky stickers
Children’s art supplies (finger paints, crayons, paper, etc)
Glue
Craft knife
Construction
Basically this card will look like a laptop when finished. Mine looks like a MacBook Pro, just because that’s hubby’s laptop, but you could make it look like any computer. Just adjust your colours accordingly.

Start by folding the A3 card in half. This is the base for the laptop and you’ll be sticking everything onto this. You can use smaller card if you like but the smaller you make it the less room you’ll have inside for your little geeklings’ contribution.
Next get a sheet of A4 card for the cover of you laptop. This should be decorated with as many geek culture stickers as you can get your hands on. This is a nice bit for kids to help with. I placed the Apple logo and the ‘happy Father’s day’ letters and let Ben put the rest of the stickers on. Once you’re happy with it you can stick it on the A3 card and put it somewhere safe, because the next bit might get messy.

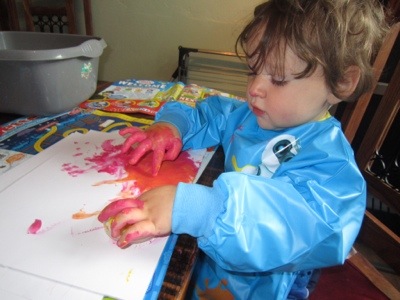
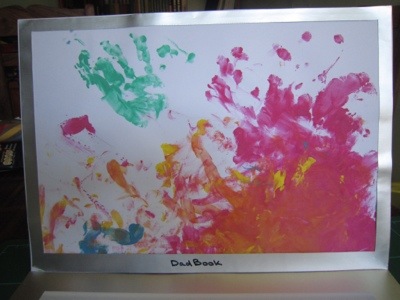
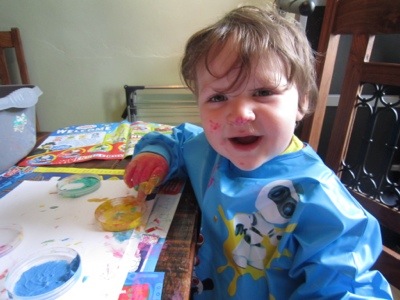
For the laptop screen you need a piece of artwork from your little darlings. We did finger painting. Ben loved it. Elliott had no idea what was happening but I managed to get a hand print out of him. The possibilities are really endless here depending on how old your helpers are, but that’s for them to worry about and you to provide materials for. The screen is very much their bit of the card. If your little geekling is too young to contribute you could decorate with family photos instead :).
Stick your piece of artwork to the left hand inside of the card, then using another bit of coloured card cut out a frame to make the casing for the laptop screen. Mine is 1cm think at all sides except the bottom, which is 1.5cm. Stick it over the top of the picture and that’s another bit done!
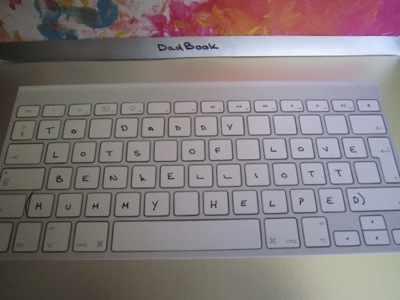
Finally you need a keyboard for the laptop. To make mine I got an Apple keyboard off google images and used photoshop to rub out the letters that were on it. Then I printed it out and wrote my own message on the keys. Alternatively you could make your keyboard out of square stickers, or you could find a fun keyboard themed font and print out a message. Whatever you use, you need to stick you keyboard/message onto the last bit of coloured card, then stick the whole thing onto the righthand inside of the A3 card.
And now it’s done! One collaborative geek-parent appreciation card :).

And one messy child. Sorry about that.
I love this!
Well it goes without saying that I loved it. Only question is, where do I stick it now, in the office, in the home office…
Really should put up the pictures of Ben doing the Mother’s day cards…
This is a fantastic idea. You did a great job of explaining it too. By the way Messy Kids are a sign of a job well done. : )